How to Set Up Lead and Sale Tracking in CutMe Short (Step-by-Step)
Quick answer
To set up lead and sale tracking in CutMe Short, open Events in the left sidebar and click Start Journey. Then create a short link, switch on Track leads & sales, add the one-line tracking script to your website's <head>, and send lead and sale events from your backend with the CutMe Short SDK, using the cms_id cookie as the click ID. Most teams finish in under an hour.

This guide takes you from zero to your first attributed sale in CutMe Short Events. It's written for marketers and developers working together: the first half is all clicks in the dashboard, and the second half has the code your developer needs.
New to the idea? Read how click, lead and sale tracking works first. Selling on Shopify? Use the Shopify setup guide instead; it needs no code.
How it fits together
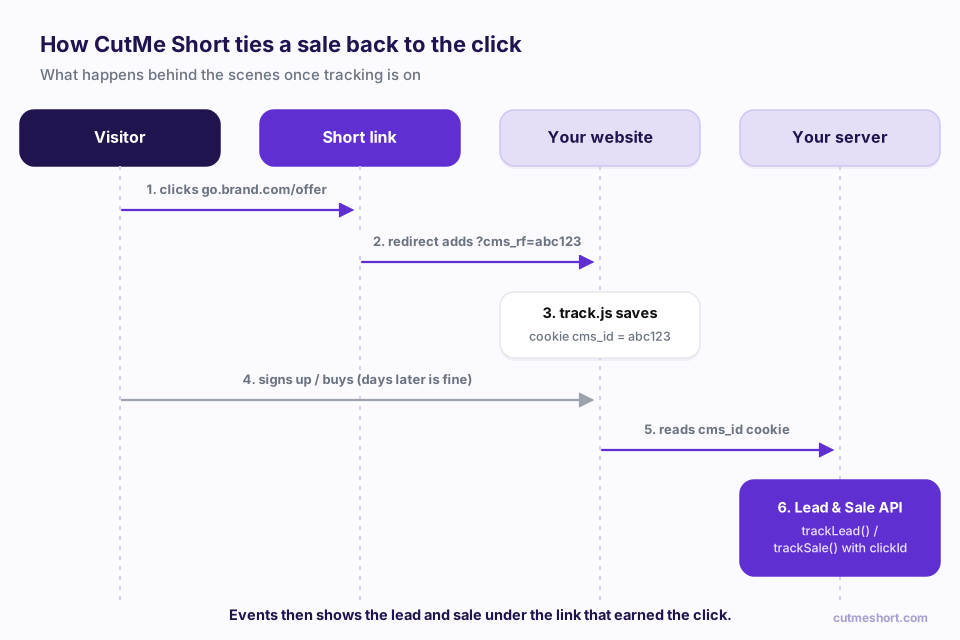
- A visitor clicks a short link with tracking switched on.
- CutMe Short redirects them to your site and adds
?cms_rf=<click ID>to the URL. - The tracking script on your site saves the click ID in a cookie called
cms_id. - Later, the visitor signs up or buys.
- Your server reads the
cms_idcookie… - …and sends a lead or sale event to CutMe Short with that click ID.
What you'll need
- A CutMe Short plan that includes lead and sale tracking. If you see Upgrade to unlock on the Events page, your plan doesn't include it yet.
- Access to your website's
<head>(or whoever manages your site). - A developer, for about an hour, to send lead and sale events from your backend.
Step 1: Start the setup journey
- In the left sidebar, click Events.
- You'll see a welcome card: "Track every click, lead & sale in one place." Click Start Journey.
- The Lead & Sale Tracking checklist opens, with five steps and a Setup Progress counter.
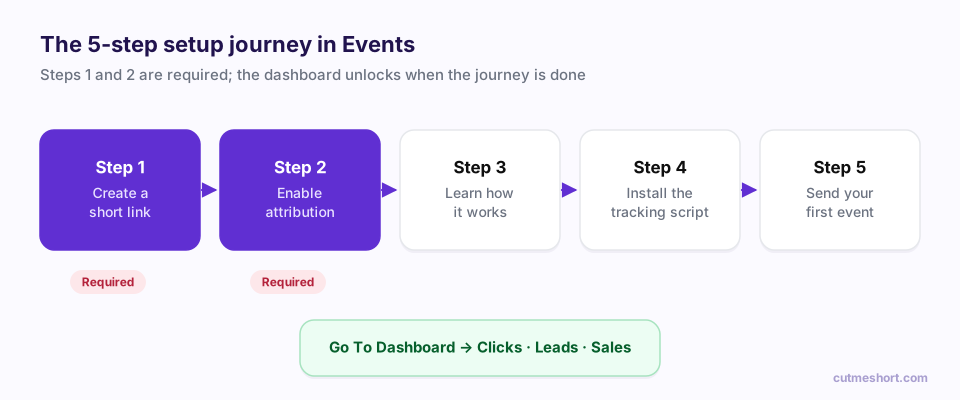
Steps 1 and 2 are marked Required. Each later step unlocks when the one before it is done.
Step 2: Create your first short link
If you already have links, this step is ticked automatically. Otherwise, click Create Short Link and create one pointing to the page where your campaign lands, for example your pricing or sign-up page.
Create one link per channel or partner for the same destination, such as go.brand.com/launch-ig and go.brand.com/launch-email. That's what lets you compare channels by revenue later.
Step 3: Enable attribution tracking on your links
In step 2 of the checklist, Enable attribution tracking, use Search links... to find your link and turn on its switch. The link shows an Active badge.
You can also do this at any time from your Links page: each link card has a Track leads & sales switch. When it's on, you'll see "Tracking leads and sales for this link" and a View details → link that opens Events filtered to that link.
Only links with Track leads & sales switched on add the click ID to the visitor's URL. Turn it on for every link you want to attribute revenue to.
Step 4: Learn how attribution works
Step 3 of the checklist, Learn how attribution works, has an Open Docs button that opens the Lead & Sale Tracking documentation. Worth five minutes for whoever writes the code.
Step 5: Install the tracking script
In step 4, Install tracking script, copy the snippet shown in the app and add it inside the <head> tag of your website:
<script
  src="https://cut-me-short-public.s3.ap-south-1.amazonaws.com/production/track.js"
  data-config='{"days":30,"attribution":"last"}'
></script>
Add it to every page if you can, and at minimum to the pages your links land on.
The data-config settings control attribution:
| Setting | In the snippet | What it does |
|---|---|---|
days | 30 | The attribution window: how many days the click ID is kept |
attribution | "last" | "last" credits the most recent tracked click; "first" keeps the first one |
Verify the installation
Back in the checklist, enter your Website URL and click Verify Installation. CutMe Short fetches your page and looks for the script. You'll see either:
- "Tracking script detected successfully.", or
- "Tracking script not found. Please ensure the script is installed correctly."
Using Google Tag Manager or another tag manager? Verify Installation checks your page's HTML as delivered by your server, so a script added by a tag manager won't be detected even if it works. Use the manual check below instead.
Manual check: open https://yourwebsite.com/?cms_rf=test in your browser, open DevTools (Application → Cookies) and look for a cookie named cms_id with the value test. If it's there, the script is working.
Step 6: Generate an API token
Your backend needs an API token to send leads and sales.
- Click Settings in CutMe Short.
- Open the Link card, then Links Settings.
- Click API Tokens.
- Click Generate API Token and copy it.
Treat the token like a password. Store it as an environment variable on your server, for example CMS_API_KEY, and never put it in front-end code, a public repository or a browser script.
Step 7: Send leads and sales from your backend
In step 5 of the checklist, Send your first lead or sale event, click View SDK docs to open the SDK documentation. Here's the essentials using the TypeScript/Node.js SDK.
Install the SDK
npm install cutmeshort
Read the click ID
The tracking script stores the click ID in the cms_id cookie on your domain. Read it on your server when the visitor converts. For example, in an Express app with cookie-parser:
const clickId = req.cookies["cms_id"]; // undefined if the visitor didn't arrive via a tracked link
If your backend runs on a different domain from your website, read the cookie in the browser and send it to your backend along with the sign-up or checkout request.
Send a lead
Call trackLead when someone does the thing you count as a lead, such as creating an account:
import { CMS } from "cutmeshort";

const cms = new CMS({ apiKey: process.env.CMS_API_KEY! });

await cms.trackLead({
  clickId,                          // value of the cms_id cookie
  eventName: "Sign Up",
  customerExternalId: user.id,      // your own stable ID for this customer
  customerName: user.name,          // optional
  customerEmail: user.email,        // optional
});
Send a sale
Call trackSale when a payment succeeds, ideally from your payment confirmation handler or webhook, not from the browser:
await cms.trackSale({
  clickId,
  eventName: "Purchase",
  customerExternalId: user.id,      // the same ID you used for the lead
  invoiceId: order.id,              // unique per order
  amount: 49.99,                    // in major units: 49.99 means $49.99
  currency: "USD",                  // ISO currency code; converted to USD for reporting
});
Fields at a glance
| Field | Lead | Sale | Notes |
|---|---|---|---|
customerExternalId | Required | Required | Your stable ID for the customer. Use the same value for their lead and their sales |
clickId | Recommended | Recommended | The cms_id cookie value; this is what links the event to the click |
eventName | Yes | Optional | For example "Sign Up", "Demo Booked" or "Purchase" |
customerName, customerEmail | Optional | Optional | Shown in the Events tables |
amount | Required | Major units (49.99, not 4999) | |
currency | Optional | Defaults to USD | |
invoiceId | Recommended | A unique order or invoice ID, used to avoid double-counting revenue |
Leads that convert much later. If a customer signs up today and qualifies or buys weeks later, possibly from another device, the docs describe a deferred lead mode: you link the click to the customer once, then send later events with just the customerExternalId. See the Lead API reference for details.
Not using Node.js? CutMe Short also offers Python and PHP SDKs, and you can call the API directly. See the Lead and Sale API references.
Step 8: Test end to end
- Open your tracked short link in a private browser window.
- Check that the landing page URL contains
?cms_rf=…and that thecms_idcookie is set. - Complete a test sign-up, and a test purchase if you can.
- In CutMe Short, click Events and check the Leads and Sales tabs.
Once the journey is complete you'll see Journey Completed; click Go To Dashboard to open the full Events dashboard.
Reading the Events dashboard
- Clicks, Leads and Sales cards at the top. Sales shows total attributed revenue in USD. Each card has a 30-day trend line.
- Tabs for clicks, leads and sales, each with a detailed table.
- Filters for links, date range, country, state, city and device.
Troubleshooting
| Symptom | Likely cause | Fix |
|---|---|---|
No ?cms_rf= in the landing page URL | Track leads & sales is off for that link | Switch it on in the link card |
cms_rf is in the URL but there's no cms_id cookie | The script isn't on that page, or it's blocked | Add the script to the landing page's <head>; check for consent tools or ad blockers in testing |
| Verify Installation fails but the cookie is set | The script is added by a tag manager | Ignore the failed check; the manual cookie test is what counts |
| Sales show the wrong amount | Amount sent in cents | Send major units: 49.99, not 4999 |
| Revenue counted twice | Same order sent twice without an invoice ID | Send a unique invoiceId for every order |
401 Unauthorized | Missing, wrong or expired token | Send Authorization: Bearer <token> with a freshly generated token |
| Leads appear but aren't linked to a link | No clickId sent | Read the cms_id cookie and pass it as clickId |
Frequently asked questions
Where do I find my CutMe Short API token?
Go to Settings → Link → Links Settings → API Tokens and click Generate API Token.
Should I send sales from the browser or my server?
From your server. Your API token must stay secret, and sending sales from your payment confirmation (for example a payment provider's webhook) means only completed payments are counted.
Can I track several types of lead?
Yes. Use a different eventName for each, such as "Sign Up", "Demo Booked" or "Trial Started". The event name appears in the Leads table.
Do I need the tracking script if I send events from my server?
Yes. The script captures the click ID when the visitor lands on your site. Without it, your server has no cms_id cookie to read, and leads and sales can't be linked to the link that was clicked.
Can I use first-click attribution instead of last-click?
Yes. Change "attribution":"last" to "attribution":"first" in the script's data-config.